低代码平台前端的设计与实现(二)构建引擎BuildEngine切面处理设计
上一篇文章,我们介绍了如何设计并实现一个轻量级的根据JSON的渲染引擎,通过快速配置一份规范的JSON文本内容,就可以利用该JSON生成一个基础的UI界面。本文我们将回到低开的核心—页面拖拉拽,探讨关于页面拖拉拽的核心设计器Designer的一些基本前置需求,也就是构建引擎BuildEngine切面处理设计。
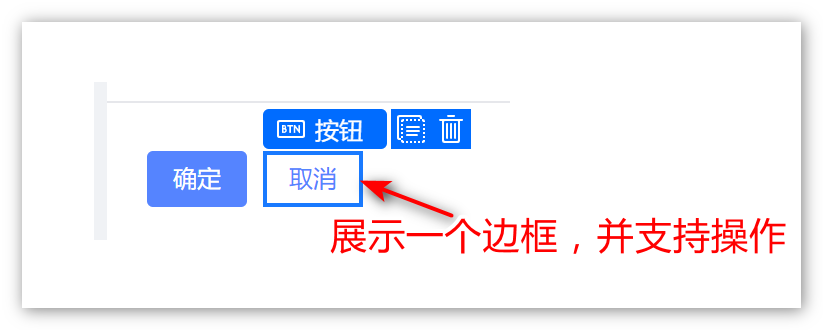
只要接触过低开平台的朋友都见过这样的场景,在设计器的画布中点击已经拖拉拽好的UI元素,会有一个边框,高亮显示当前的元素,还支持操作:

在上一篇文章我们介绍了创建的整个流程:由一个构建引擎(BuildEngine)通过读取JSON DSL的组件节点ComponentNode来匹配对应的节点类型来生成UI元素。
为了实现设计器画布选中边框的需求,首先想到的一个解决方案就是仿照BuildEngine做一个类似的DesignerBuildEngine,里面的流程和BuildEngine大致相同,只是在生成最终的ReactNode节点的时候,在其外围使用某个元素进行包裹,具备边框等功能:
1
2
3
4
5
6
7
8
9
10
11
12
|
class DesignerBuileEngine {
innerBuild() {
const reactNode = xxx;
return React.createElement(
'div', {
},
reactNode);
}
}
|
但是这并不是一个很优雅的设计,因为如果我们衍生出一个新的DesignerRenderEngine,那么我们需要同时维护一个设计态一个运行态两个Engine,尽管他们的处理流程大致相同。
切面设计
组件构建处理
为了避免功能代码的冗余,也更方便后续的扩展性。我们考虑采用切面的设计方案。将整个处理流程的某些环节加入切面,以达到灵活处理的目的。切面的实现可以有很多种形式,例如一个回调函数,又或者传入一个对象实例(本质上还是回调)。作为一个轻量级低开模块,我们暂时设计一个简单的回调customCreateElement(createElement自定义实现),来完成build过程中,最后一步生成ReactNode的自定义处理:

该自定义创建方法将作为build的一个参数传入到构造过程中来进行调用,形如:
1
2
3
4
5
6
7
8
9
10
11
12
13
14
15
16
17
|
class BuildEngine {
build(componentNode, customCreateElement) {
this.innerBuild(componentNode, '/' + componentNode.componentName, customCreateElement);
}
private innerBuild(componentNode, path, customCreateElement) {
if (typeof customCreateElement === 'function') {
return customCreateElement(CompConstructor, {...props}, children);
}
return React.createElement(CompConstructor, {...props}, children);
}
}
|
根据上述的流程,我们先定义CustomCreateElement:
1
2
3
4
5
6
7
8
9
10
11
12
13
14
15
16
17
18
19
20
21
22
23
24
25
26
27
28
29
30
31
32
33
| import {ReactNode} from "react";
import {ComponentNode, ComponentNodePropType} from "../../meta/ComponentNode";
interface CustomCreateElementHandleContext {
componentNode: ComponentNode;
path: string;
ComponentConstructor: any;
props: {
[propName: string]: ComponentNodePropType
};
children?: ReactNode[];
}
export interface CustomCreateElementHandle {
(context: CustomCreateElementHandleContext): ReactNode | undefined;
}
|
这里我们使用TS的函数接口,参数context包含的字段目前有:
- componentNode 组件节点数据。将该值传入,可以在后续的处理中,根据对应的ComponentNode原始数据方便的进行自定义扩展处理。
- path 组件节点的路径。将该值传入,可以在后续的处理中,根据对应的path方便的进行扩展处理。
- ComponentConstructor 已知匹配到的组件构造器。这里专门使用大驼峰,就是想指明是一个组件的构造器。
- props 从ComponentNode中取到的props。注意,这里是从ComponentNode中取到的未经任何处理的原始props。
- children 已经创建完成的ReactNode数组或undefined。
如此,我们将构建引擎的中对于ReactNode节点的处理通过切面的方式,允许交给外部调用者方便进行灵活的定制开发。
回顾整个构建的流程,假设在运行时模式下(RuntimeMode),我们可以都是按照JSON DSL通过映射到默认的组件构造器来直接创建对应的ReactNode;而当处于设计态(DesginMode)的时候,就可以通过CustomCreateElementHandle机制,让上一层进行一定的包裹,进而产生出设计态的效果。
BuildEngine集成
接下来,我们将上述的CustomCreateElementHandle集成到我们的BuildEngine中,考虑到后续还可能会有新的构建过程的一些上下文,我们先定义一个BuildOptions接口类型,方便后续构建过程中,扩展更多的功能。当然,现阶段定义如下:
1
2
3
4
5
6
7
8
9
|
export interface BuildOptions {
onCustomCreateElement?: CustomCreateElementHandle;
}
|
然后,我们适当修改原来的BuildEngine.build方法的入参,暴露buildOptions:
1
2
3
4
5
6
| // build方法和innerBuild均需要暴露
- build(componentNode: ComponentNode) {
+ build(componentNode: ComponentNode, buildOptions?: BuildOptions) {
- private innerBuild(componentNode: ComponentNode, path: string) {
+ private innerBuild(componentNode: ComponentNode, path: string, buildOptions?: BuildOptions) {
|
对于innerBuild内部的实现,关于最后返回ReactNode的部分,适配onCustomCreateElement:
1
2
3
4
5
6
7
8
9
10
11
12
13
14
15
16
17
18
| // innerBuild内容
+ if (typeof buildOptions?.onCustomCreateElement === 'function') {
+ // 如果外部提供了对应的自定义创建实现,则使用之
+ return buildOptions.onCustomCreateElement({
+ componentNode,
+ path,
+ ComponentConstructor: componentConstructor,
+ props: {...props},
+ children: childrenReactNode.length > 0 ? childrenReactNode : undefined
+ })
+ }
// 否则使用默认实现
return React.createElement(
componentConstructor,
{...props, key: path},
childrenReactNode.length > 0 ? childrenReactNode : undefined
)
|
至此,我们针对构建引擎BuildEngine设计了一个关键点的切面处理,为后续构建引擎支撑开发设计态提供了技术上的可能性。
基本测试
接下来,我在样例代码的地方,我们编写一个添加了onCustomCreateElement构建参数的Demo,来展示切面的效果。首先照旧,核心库里面导出对应的类型:
1
2
3
| export * from './meta/ComponentNode';
export * from './engine/BuildEngine';
+ export * from './engine/aspect/CustomCreateElementHandle';
|
然后在,在样例工程中添加了一个新的样例页面CustomCreateElementExample:
1
2
3
4
5
6
7
8
9
10
11
12
13
14
15
16
17
18
19
20
21
22
23
24
25
26
27
28
29
30
31
32
33
34
35
36
37
38
39
40
41
42
43
44
45
46
47
48
49
50
51
52
53
54
55
56
57
58
59
60
61
62
63
64
65
66
67
68
69
70
71
| import {BuildEngine} from "@lite-lc/core";
import {ChangeEvent, createElement, useState} from "react";
import {Input} from 'antd';
export function CustomCreateElementExample() {
const [buildEngine] = useState(new BuildEngine());
const [componentNodeJson, setComponentNodeJson] = useState(JSON.stringify({
"componentName": "page",
"children": [
{
"componentName": "button",
"props": {
"size": "small",
"type": "primary"
},
"children": [
{
"componentName": "text",
"props": {
"value": "hello, my button."
}
}
]
},
{
"componentName": "input"
}
]
}, null, 2))
let reactNode;
try {
const eleNode = JSON.parse(componentNodeJson);
reactNode = buildEngine.build(eleNode, {
onCustomCreateElement: (ctx) => {
const {ComponentConstructor, props, path, children} = ctx;
console.debug('path: ', path)
console.debug('props: ', props)
return createElement(ComponentConstructor, {
...props,
key: path
}, children)
}
});
} catch (e) {
reactNode = <div>JSON格式出错</div>
}
return (
<div style={{width: '100%', height: '100%', padding: '10px'}}>
<div style={{width: '100%', height: 'calc(50%)'}}>
<Input.TextArea
rows={4}
value={componentNodeJson}
onChange={(e: ChangeEvent<HTMLTextAreaElement>) => {
const value = e.target.value;
// 编辑框发生修改,重新设置JSON
setComponentNodeJson(value);
}}/>
</div>
<div style={{width: '100%', height: 'calc(50%)', border: '1px solid gray'}}>
{reactNode}
</div>
</div>
);
}
|
这段代码和上一章中的SimpleExample的核心差别在于:
1
2
3
4
5
6
7
8
9
10
11
12
13
| const eleNode = JSON.parse(componentNodeJson);
- reactNode = buildEngine.build(eleNode);
+ reactNode = buildEngine.build(eleNode, {
+ onCustomCreateElement: (ctx) => {
+ const {ComponentConstructor, props, path, children} = ctx;
+ console.debug('path: ', path)
+ console.debug('props: ', props)
+ return createElement(ComponentConstructor, {
+ ...props,
+ key: path
+ }, children)
+ }
+ });
|
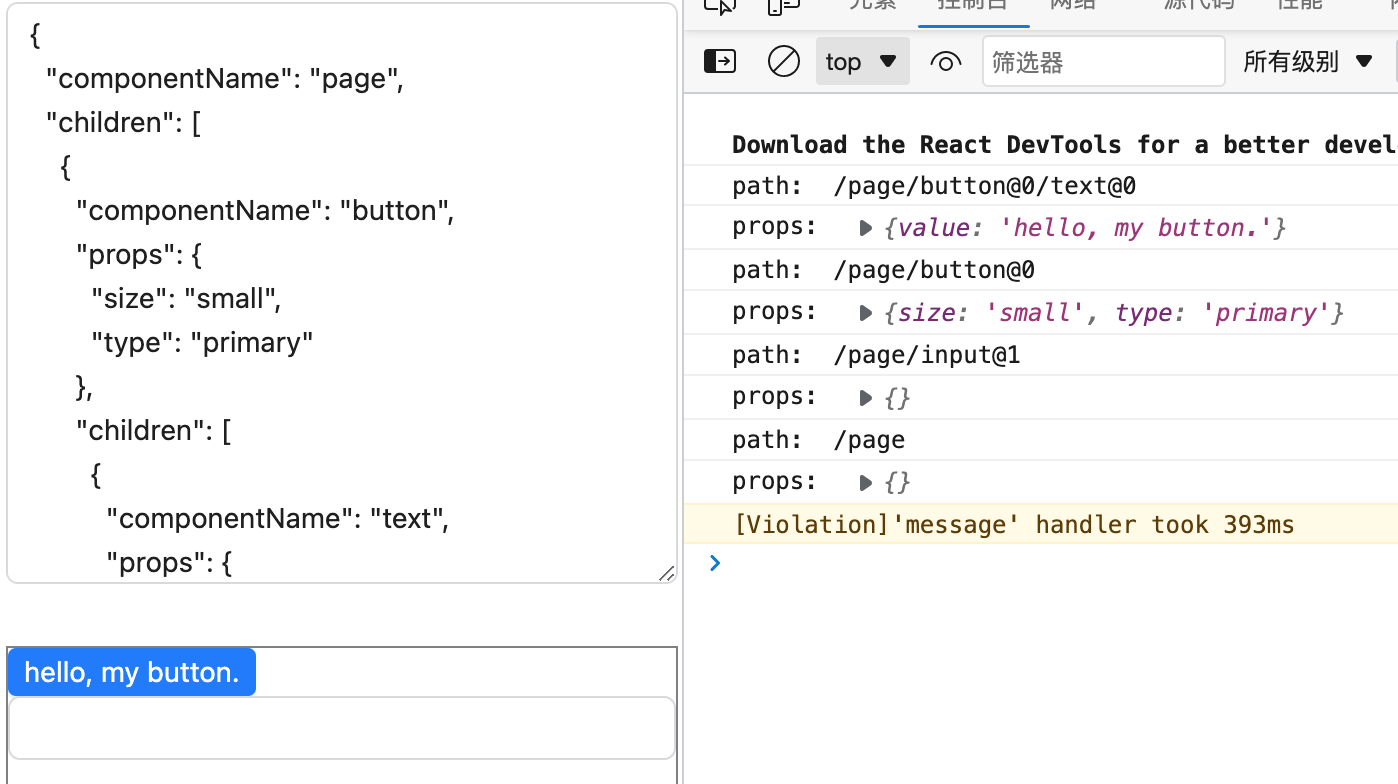
原本直接调用buildEngine.build的地方,我们加入我们自定义的实现,并进行了打印。从下面的效果也能看出:

附录
本文的所有内容已经提交至github仓库
w4ngzhen/lite-lc (github.com)
本章对应tag为chapter_02


